Outputs
The output
An output is one or more windows that display content (backgrounds, slides, overlays, and more) on a physical HDMI screen/projector. But can also be sent wirelessly through NDI.
Layers
The output(s) in FreeShow have several stacked layers. Think of these layers as a stack of paper, but some of them are mostly transparent.
 Backgrounds are the bottom layer in the stack. On top of that are slides (text) and overlays. This layers merge together on top of each other to make the final visual output.

The last two layer are not visual. They are the audio and slide timer layers.
Each layer can be toggled off independently of each other. The visual layers can each be set as active or nonactive layers in the styles for outputs in Settings.
You can see all the layers in the "Show" view, on the right side right under the "Clear all" button, under the controls. 
Clear All (on top), Background, Slide, Overlays, Audio, Slide timer
The green arrow points to the location of the little almost invisible layer info buttons") If a layer is active you can click on it to clear it, also click the little almost invisible button right under to see more info, like media controls for the background.
If a layer is active you can click on it to clear it, also click the little almost invisible button right under to see more info, like media controls for the background.
Click the big "Clear all" button to clear all layers. , while the overlay, audio and slide timer layers are not (buttons with dark gray background)")
Click the Restore Output button to restore all layers in the current slide.

Enabling the output
To activate the output window(s), press the present button (up arrow) in the top right corner or press Ctrl/CMD+O.  The button is red when the output window(s) are active.
  To stop presenting click the button twice. If you only click it once it will remind you to click it again.
You can also use the shortcut key CTRL/CMD+O to stop presenting. FreeShow will do this right away and will not ask for confirmation.
Right under the presentation button are output preview(s) that show the same content as the output window(s), and to monitor sound levels there is an audio meter to the right of the previews (vertical green bars).

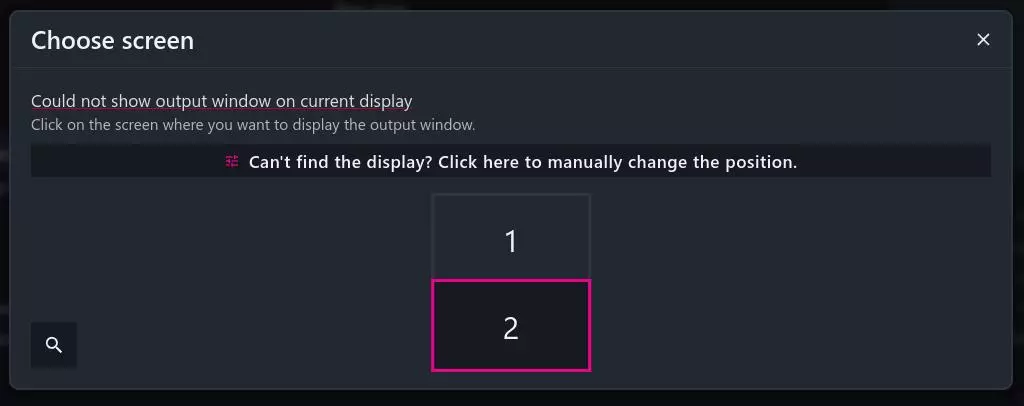
If you get a popup stating that the output can't display you have to select the display you want to use by clicking on it.
Double click on the output window to disable it. This is useful to know in case an output window positions itself on top of the main FreeShow window.
Hold CTRL/CMD while hovering over the output window to show a drag bar at the top.
Controls
Right under the output preview area on the right you will find some output controls.

 The first two buttons Previous Slide and Next Slide are for changing the current slide in the current show that is being shown on the outputs (arrow left/right on the keyboard). The center button either, Start Show or Update Output that will play the selected show or replay the currently being presented slide with any changes. The padlock button locks and unlocks the all outputs. This means the outputs will not change until it is unlocked.
In addition to being able to lock all outputs, each individual output's lock status can be toggled by clicking on the title bar of its preview window. A colored dot shows the status of each output.
Output Statuses
- Green - Active, presenting
- Red - Inactive, not presenting
- Blue - NDI Connected
- Grey - Disconnected invisible window, most likely disconnected NDI
- Yellow - Output is locked, the output content will not change until it is unlocked. The title for a locked preview window has a strike through its name to alert you that in is currently locked.

Transitions
The rightmost button under the preview window(s) Transition, changes the global transitions. Clicking this will give you a popup with various different transition types, and different options for text/media etc.
 In addition to the global transitions, you can also set transitions per textbox, slide & output! If a transition is set on a slide that will apply to all the textboxes, but if a single textbox has its own transition that will be prioritized. Transitions are prioritized in this order: Textbox > Slide > Output Style > Global Transitions.
Press "Enable more specific transitions" for more customizability. This gives you the ability to set different transitions for In & Out. Also for slides you can set Between transitions, this means simply that if a slide layer is already active Between will be used until it is cleared, then the Out will trigger.
Settings
You can find the output settings by clicking the gear icon in the top right, and choosing "Outputs" from the left menu. One can add multiple outputs, change the output style, enable NDI, and more.
Click on "Add" at the bottom to create a new output, you can choose between a normal output, or a stage output. At the bottom you can right-click on the output you created to change e.g. the color, this can be useful to identify outputs if you have multiple outputs.

Window
Under Window you can select the physical display to set the output to. If the Invisible window setting (Under NDI settings) has been turned on you can then only set the size of the output.
You can disable Always on top, if you want to hide a output behind another window. This is useful if you want to capture the window using another program. This will also make the window resizable.
If you want to change the position of the output window, you can do this:
- Click "Choose screen" in the settings, and follow the instructions on screen.
- If you can't see your output screen for some reason you can change the output values manually by clicking "Change output screen values" and changing the the X/Y values until the window is positioned over the screen.
- Remember to click the button in the top right to enable the output windows. It should be red when activated.